Every 3D printing beginner eventually meets the same emotional milestone.
You start a print.
You feel hopeful.
The machine begins moving with tiny robotic confidence.
You walk away for what feels like five innocent minutes.
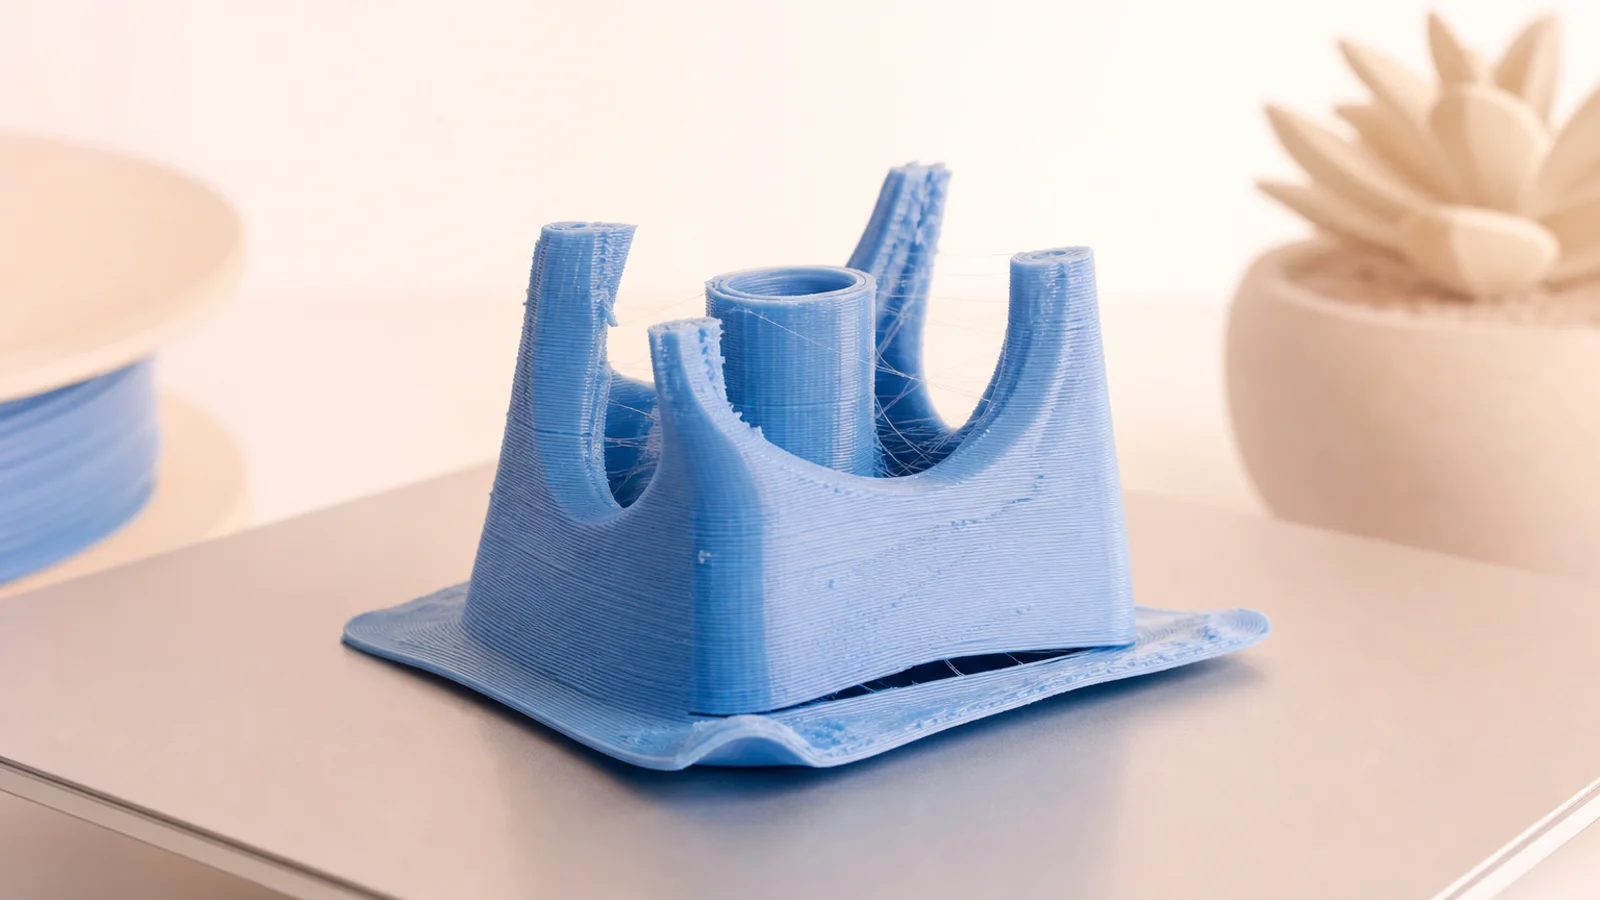
You come back and discover that your printer has produced a plastic bird’s nest, a melted pancake, a corner-lifted rectangle, or something that can only be described as “abstract disappointment.”
Welcome.
You are now participating in 3D printing.
Failed prints are not a sign that you are uniquely cursed. They are part of the learning process. A very physical, slightly crunchy learning process.
The annoying part is that different problems can look similar at first. A print can fail because of bed leveling, temperature, speed, filament, model geometry, supports, cooling, slicer settings, mechanical issues, or one tiny corner of the universe deciding to be theatrical.
The useful part is that most failures leave clues.
A failed print is not just trash.
It is evidence.
Possibly stringy evidence.
But evidence.
The simple version
3D prints usually fail because something in the chain did not match what the material, machine, or model needed.
That chain looks like this:
model → slicer → settings → printer → filament → first layer → object
If one part of the chain is wrong, the print can suffer.
Maybe the model needs supports.
Maybe the bed is not level.
Maybe the nozzle is too far from the bed.
Maybe the filament is wet.
Maybe the temperature is too low.
Maybe the print speed is too high.
Maybe the slicer settings are being optimistic in a way only software can be.
If you are new to the whole process, I would start with my beginner guide to 3D printing basics first. This article is the troubleshooting room: the place we go after the printer has made something weird and we need to ask why.
The beginner-friendly rule is:
Do not ask “why did my printer fail?” Ask “where in the chain did the failure begin?”
That question is much more useful.
It also makes you feel slightly less like you are arguing with a tiny plastic volcano.
The first layer: where hope is tested
The first layer is the foundation of the print.
If it goes well, the rest of the print has a fighting chance.
If it goes badly, the print may fail before it ever becomes interesting.
A bad first layer can look like:
- lines not sticking to the bed;
- filament dragging behind the nozzle;
- gaps between lines;
- lines squished too flat;
- a corner lifting;
- plastic curling upward;
- the nozzle scraping the bed;
- a sad little mess that never becomes a shape.
This is why people talk about first layers so much.
Not because the 3D printing community enjoys repeating itself, although it absolutely does.
Because the first layer matters.
A lot.
Nozzle too high
If the nozzle is too far from the bed, the filament may not press down properly.
Instead of sticking, it gently rests on the surface like it is considering its options.
You may see round lines that do not connect well.
The print may peel away.
The first layer may look loose or stringy.
The fix usually involves adjusting bed leveling, Z offset, or first-layer settings.
The goal is for the filament to be pressed onto the bed enough to stick, but not so much that it gets smashed into a tragic plastic smear.
Very technical.
Very “just right.”
Very Goldilocks, but with heated machinery.
Nozzle too low
If the nozzle is too close to the bed, it may scrape the surface or block filament from coming out properly.
You may see:
- extremely thin lines;
- rough scraping marks;
- clicking from the extruder;
- missing filament;
- nozzle marks on the bed;
- an unpleasant feeling that the machine is trying to engrave your build plate.
This can damage the bed, clog the nozzle, or make the first layer inconsistent.
Again, Z offset and leveling matter.
The printer needs enough space to push filament out cleanly.
Not a canyon.
Not a paper cut.
A tiny controlled gap.
3D printing is full of tiny controlled gaps. This is why it builds character.
Against your will, sometimes.
Bed adhesion: why prints let go
Bed adhesion is the relationship between the first layer and the print surface.
Like many relationships, it can fail because the conditions were bad from the beginning.
Common adhesion issues include:
- dirty print bed;
- wrong bed temperature;
- wrong nozzle height;
- poor leveling;
- too little first-layer squish;
- printing too fast on the first layer;
- material not suited to the surface;
- drafts or temperature changes;
- not enough brim or raft for difficult shapes.
A clean bed matters more than beginners expect.
Finger oils, dust, old glue, and tiny leftovers from previous prints can all cause problems.
Sometimes the fix is not dramatic.
Sometimes it is just cleaning the bed.
Which is both satisfying and mildly insulting.
You spend an hour adjusting settings, then the solution is “wash the thing.”
Technology does enjoy humility.
Warping: when corners rebel
Warping happens when parts of the print shrink or lift as they cool.
It often shows up as corners curling upward from the bed.
This is especially common with materials that shrink more as they cool, or when the print environment changes temperature too quickly.
Warping can happen because:
- the bed is too cool;
- the room is drafty;
- the material shrinks a lot;
- the first layer did not stick well;
- the print has sharp corners;
- the part is large and flat;
- cooling is too aggressive;
- an enclosure is needed but not used.
Warping is annoying because it can ruin prints that looked fine at the start.
Everything begins peacefully.
Then one corner slowly lifts like it has remembered an appointment elsewhere.
Possible fixes include:
- improving first-layer adhesion;
- increasing bed temperature where appropriate;
- using a brim;
- reducing drafts;
- using an enclosure for certain materials;
- adjusting cooling;
- redesigning sharp corners;
- choosing a more beginner-friendly material.
Warping is a reminder that 3D printing is not only about shape.
It is also about heat.
Heat arrives, heat leaves, plastic reacts, and your print becomes a tiny physics negotiation.
Spaghetti prints: the classic disaster
A spaghetti print happens when filament keeps extruding, but the object is no longer forming correctly.
Instead, loose strands of plastic pile up into a chaotic nest.
It looks like the printer tried to make pasta and lost emotional control.
Spaghetti can happen when:
- the print detaches from the bed;
- a support fails;
- the nozzle hits the print and knocks it loose;
- the model has unsupported areas;
- layer adhesion fails;
- the printer loses position;
- the filament does not stick where it should.
The printer does not always know something went wrong.
It keeps following instructions.
This is what makes spaghetti prints so dramatic. The machine is technically doing its job, but the object left the conversation several minutes ago.
If you see spaghetti, look for the moment the print stopped being attached or supported.
Ask:
- Did the first layer fail?
- Did a tall part wobble?
- Did supports break?
- Did the nozzle collide with the print?
- Did the model need more support?
- Did bed adhesion fail halfway through?
The spaghetti is the final symptom.
The cause started earlier.
Like many disasters, but with more PLA.
Stringing: tiny hairs everywhere
Stringing happens when thin strands of filament appear between parts of the print.
It can make the object look like it walked through a spider web.
Or like the printer sneezed plastic.
Stringing often happens when melted filament oozes from the nozzle while the printer moves between areas.
Common causes include:
- nozzle temperature too high;
- retraction settings too low;
- travel speed too slow;
- wet filament;
- material that naturally strings more;
- poor cooling;
- slicer settings that need tuning.
Retraction is the setting that pulls filament back slightly when the nozzle travels.
The idea is to reduce oozing.
If retraction is too low, filament may leak during travel moves.
If retraction is too high, you can create other problems.
Because of course.
3D printing settings rarely say:
Here is one perfect value. Enjoy peace forever.
More often they say:
Please tune this based on material, printer, nozzle, temperature, speed, mood, moon phase, and whether you are already late.
Stringing is usually fixable, but it may take testing.
A temperature tower or retraction test can help.
And yes, 3D printing people love test prints because apparently we enjoy making small diagnostic monuments.
Layer shifting: when the print moves sideways
Layer shifting happens when upper layers are offset from lower layers.
The print looks like part of it slid sideways and tried to continue as if nobody noticed.
This can happen because:
- belts are loose;
- pulleys are slipping;
- the nozzle hit the print;
- the print speed is too high;
- acceleration is too aggressive;
- stepper motors skipped steps;
- something physically blocked movement;
- the printer frame is not stable.
Layer shifts are often mechanical.
That means slicer settings may not be the whole story.
Check the machine.
Look at belts.
Look at pulleys.
Look for wobble.
Make sure nothing is catching.
Make sure cables are not snagging.
Sometimes the problem is not in the digital file.
Sometimes the printer is physically doing a tiny sideways betrayal.
Under-extrusion: not enough plastic
Under-extrusion means the printer is not pushing out enough filament.
The print may look weak, thin, gappy, or incomplete.
You may see:
- missing lines;
- weak walls;
- gaps in top layers;
- poor layer bonding;
- brittle parts;
- inconsistent extrusion.
Possible causes include:
- clogged nozzle;
- partial blockage;
- filament grinding;
- wrong filament diameter setting;
- low nozzle temperature;
- extruder tension problems;
- tangled filament;
- poor-quality filament;
- printing too fast for the hot end.
Under-extrusion can be subtle.
The print might complete, but feel weak or look rough.
This is one of those problems where the printer technically “worked,” but the result has the structural confidence of a cracker.
The fix depends on the cause.
You may need to clean the nozzle, raise temperature slightly, slow down, check the extruder, or inspect the filament path.
The important thing is not to assume it is one thing every time.
Under-extrusion is a symptom.
You still need to find the reason.
Over-extrusion: too much plastic
Over-extrusion is the opposite problem.
The printer pushes out too much material.
The print may have blobs, rough surfaces, swollen edges, messy details, or poor dimensional accuracy.
Possible causes include:
- flow rate too high;
- wrong filament diameter;
- extruder calibration issues;
- temperature too high;
- slicer settings not matched to the printer;
- pressure buildup in the nozzle.
Over-extrusion can make prints look melted, puffy, or messy.
It can also cause the nozzle to drag through excess material, which may create more problems.
This is where calibration matters.
Not because calibration is fun.
Calibration is rarely fun.
Calibration is the vegetable of 3D printing.
But sometimes it is exactly what the printer needs.
Wet filament: the quiet troublemaker
Filament can absorb moisture from the air.
Some materials absorb more than others.
Wet filament can cause:
- popping or crackling sounds;
- stringing;
- rough surfaces;
- weak prints;
- bubbles;
- inconsistent extrusion;
- poor layer adhesion.
This surprises beginners because filament looks solid and harmless on the spool.
But plastic can be dramatic.
If filament has absorbed moisture, drying it can improve print quality.
Storage matters too.
Many people store filament in sealed bags or boxes with desiccant.
This sounds excessive until you spend three hours adjusting slicer settings and then discover the filament was basically humid spaghetti.
I do not love that lesson.
But I respect it.
Supports failing
Supports are temporary structures used to hold up parts of the model during printing.
They are helpful.
They are also capable of betrayal.
Supports may fail if:
- they are too thin;
- they do not stick well;
- they are knocked by the nozzle;
- support settings are too weak;
- the model has difficult overhangs;
- print speed is too high;
- cooling or material behavior causes instability.
When supports fail, the part they were holding may print in midair.
Printers are not great at printing in midair.
They try.
The result is usually not elegant.
If supports fail often, check:
- support density;
- support placement;
- support interface settings;
- first-layer adhesion;
- print orientation;
- model geometry;
- cooling;
- speed.
Sometimes the best fix is not stronger supports.
Sometimes it is rotating the model.
A different orientation can reduce overhangs and make the print easier.
This is one of those 3D printing truths that feels obvious after someone says it:
The way an object sits on the bed changes how difficult it is to print.
The model itself can be the problem
Not every 3D model is printable just because it exists.
A model can have:
- holes in the mesh;
- non-manifold geometry;
- walls too thin to print;
- unsupported overhangs;
- tiny details below nozzle resolution;
- floating parts;
- intersecting shapes;
- impossible internal structures.
A model may look fine on screen and still confuse the slicer.
This is especially common with models made for animation, rendering, or games rather than printing.
A model for a video game only needs to look right.
A model for 3D printing needs to become a physical object.
That is a much stricter job.
Physics does not care that the render looked cool.
Physics has never been impressed by vibes.
How to troubleshoot without losing your mind
Troubleshooting works best when you change one thing at a time.
I know.
This is boring.
You want to change seven settings and see if the printer apologizes.
But if you change too many things at once, you will not know what actually fixed the problem.
A better process:
- Look at where the failure started.
- Identify the likely category.
- Change one setting or condition.
- Test again.
- Compare the result.
- Keep notes.
The note-taking part sounds unnecessary until you realize you have changed nozzle temperature, bed temperature, speed, fan settings, and retraction, and now the print is worse but in a new and educational way.
A simple note can save you from becoming your own mystery.
Write down:
- filament type;
- nozzle temperature;
- bed temperature;
- layer height;
- speed;
- support settings;
- what failed;
- what improved.
Future you will appreciate this.
Future you is always more organized in theory.
A tiny glossary
First layer
The first layer is the first material the printer lays down on the bed. It is critical for adhesion and print success.
Bed adhesion
Bed adhesion is how well the print sticks to the build surface.
Poor adhesion can cause lifting, shifting, or total failure.
Warping
Warping happens when parts of a print shrink or lift as they cool.
It often affects corners and large flat areas.
Spaghetti print
A spaghetti print is a failure where loose strands of filament pile up instead of forming the object.
It usually means the print detached, supports failed, or the printer kept extruding after the shape stopped forming.
Stringing
Stringing is when thin strands of filament appear between parts of the print.
It often comes from oozing during travel moves.
Retraction
Retraction is when the extruder pulls filament back slightly to reduce oozing while the nozzle travels.
Under-extrusion
Under-extrusion means the printer is not pushing out enough filament.
It can cause gaps, weak parts, and missing lines.
Over-extrusion
Over-extrusion means the printer pushes out too much filament.
It can cause blobs, rough surfaces, and dimensional problems.
Supports
Supports are temporary structures printed to hold up overhanging parts of a model.
Slicer
A slicer is software that turns a 3D model into printer instructions.
It controls many settings that affect print success.
G-code
G-code is the instruction file the printer follows.
It tells the printer where to move, how hot to get, and how much material to extrude.
My take
3D printing failures are frustrating because they feel personal.
The machine was right there.
The model looked fine.
The filament was loaded.
The first ten minutes seemed hopeful.
Then the printer made noodles.
But most failures are not random.
They are messages.
Messy messages, yes.
Messages written in curled plastic and emotional damage.
But still messages.
The trick is to stop asking:
Why is this printer doing this to me?
And start asking:
What is the failure telling me?
Did the first layer stick?
Did the object detach?
Did the nozzle clog?
Did the supports fail?
Did the filament behave badly?
Did the model ask the printer to do something physically unreasonable?
Once you treat failures as clues, 3D printing becomes less mysterious.
Still annoying.
Still slow.
Still occasionally capable of producing a plastic crime scene.
But understandable.
And that is the point where the hobby gets better.
Not because prints stop failing.
They will fail.
Because when they do, you can look at the mess and think:
I know where to start.

Jane Calder
I'm Jane Calder, the writer behind Jane Decodes. I research AI, crypto, 3D, web technology, and strange science rabbit holes, then turn them into plain-English explanations for people who like learning but dislike being attacked by jargon.
Usually powered by coffee, browser tabs, and the stubborn belief that almost anything can be explained better.
Related posts
Filament Types Explained: PLA, PETG, ABS, TPU, and the Plastic Personality Problem
A beginner-friendly explanation of common 3D printing filament types, including PLA, PETG, ABS, TPU, print difficulty, strength, flexibility, heat resistance, and when to use each one.
Read article →
What Is a 3D Printing Slicer? The Translator Between Model and Machine
A beginner-friendly explanation of 3D printing slicers, G-code, layer height, infill, supports, temperatures, speed, and why slicer settings matter so much.
Read article →
3D Printing Basics: From Digital Model to Physical Object
A beginner-friendly explanation of how 3D printing works, from digital models and slicers to filament, layers, supports, failed prints, and real objects.
Read article →